Spring Security是一个提供了认证、授权、常见攻击保护 的框架。适用于非响应式、响应式编程的项目。是基于 Spring AOP 和 Servlet 过滤器 的安全框架,提供全面的安全性解决方案。
Spring Security 中四种常见的权限控制方式 。
表达式控制 URL 路径权限
表达式控制方法权限
使用过滤注解
动态权限
一、过滤器解析 过滤器链采用的是责任链的设计模式 ,它有一条很长的过滤器链。
1.ChannelProcessingFilter 通常是用来过滤哪些请求必须用 https 协议, 哪些请求必须用 http协议, 哪些请求随便用哪个协议都行。
核心代码:
1
2
3
4
5
6
7
8
9
10
11
12
13
14
15
public void doFilter (ServletRequest req, ServletResponse res, FilterChain chain) throws IOException, ServletException { HttpServletRequest request = (HttpServletRequest) req; HttpServletResponse response = (HttpServletResponse) res; FilterInvocation filterInvocation = new FilterInvocation (request, response, chain); Collection<ConfigAttribute> attributes = this .securityMetadataSource.getAttributes(filterInvocation); if (attributes != null ) { 。。。日志 this .channelDecisionManager.decide(filterInvocation, attributes); if (filterInvocation.getResponse().isCommitted()) { return ; } } chain.doFilter(request, response); }
2.WebAsyncManagerIntegrationFilter 用于集成 SecurityContext 到Spring异步执行机制中 。通过 SecurityContextCallableProcessingInterceptor.beforeConcurrentHandling()就可以将 SecurityContext 传递给异步线程。
核心代码:
1
2
3
4
5
6
7
8
9
10
11
12
13
14
15
16
protected void doFilterInternal (HttpServletRequest request, HttpServletResponse response, FilterChain filterChain) throws ServletException, IOException { WebAsyncManager asyncManager = WebAsyncUtils.getAsyncManager(request); SecurityContextCallableProcessingInterceptor securityProcessingInterceptor = (SecurityContextCallableProcessingInterceptor) asyncManager .getCallableInterceptor(CALLABLE_INTERCEPTOR_KEY); if (securityProcessingInterceptor == null ) { asyncManager.registerCallableInterceptor(CALLABLE_INTERCEPTOR_KEY, new SecurityContextCallableProcessingInterceptor ()); } filterChain.doFilter(request, response); }
3.SecurityContextPersistenceFilter 主要控制 SecurityContext 的在一次请求中的生命周期 。请求来临时,创建SecurityContext 安全上下文信息,请求结束时清空 SecurityContextHolder 。
请求 / 线程 < 会话 < 应用
核心代码:
1
2
3
4
5
6
7
8
9
10
11
12
13
14
15
16
17
18
19
20
21
22
23
24
25
26
27
28
29
30
private void doFilter (HttpServletRequest request, HttpServletResponse response, FilterChain chain) throws IOException, ServletException { if (request.getAttribute(FILTER_APPLIED) != null ) { chain.doFilter(request, response); return ; } request.setAttribute(FILTER_APPLIED, Boolean.TRUE); 。。。创建session HttpRequestResponseHolder holder = new HttpRequestResponseHolder (request, response); SecurityContext contextBeforeChainExecution = this .repo.loadContext(holder); try { SecurityContextHolder.setContext(contextBeforeChainExecution); 。。。日志 chain.doFilter(holder.getRequest(), holder.getResponse()); } finally { SecurityContext contextAfterChainExecution = SecurityContextHolder.getContext(); SecurityContextHolder.clearContext(); this .repo.saveContext(contextAfterChainExecution, holder.getRequest(), holder.getResponse()); request.removeAttribute(FILTER_APPLIED); } }
总结以上出现的部件概念,如下:
SecurityContextRepository :负责保证在一个用户级会话的过程中,维护住相关的安全上下文信息 。这个问题主要发生在web应用中,由于http的无状态性,所以每次request都需要重复加载安全上下文信息。默认情况下,将基于HTTP Session来完成这方面的工作。SecurityContext :安全上下文信息。SecurityContextHolder :维护一个线程的SecurityContext ,用户请求处理过程中的各种程序调用能够使用到SecurityContext。默认使用线程变量机制,对于Web应用比较合适。如果是swing程序等,可以换用文件机制。
实现每次请求/每个线程设置 SecurityContextHolder 的 SecurityContext,并在结束后清理SecurityContextHolder 。
用于添加响应头,比如 X-Frame-Options(防止点击劫持) , X-XSSProtection(防止xss注入脚本攻击), X-Content-Type-Options(防止基于 MIME 类型混淆的攻击)。
核心代码:
1
2
3
4
5
6
7
8
9
10
11
12
13
14
15
16
17
18
19
20
21
22
23
24
25
26
27
28
29
30
31
32
33
34
35
36
37
38
39
40
41
42
43
44
45
46
47
48
49
50
51
52
protected void doFilterInternal (HttpServletRequest request, HttpServletResponse response, FilterChain filterChain) throws ServletException, IOException { if (this .shouldWriteHeadersEagerly) { doHeadersBefore(request, response, filterChain); } else { doHeadersAfter(request, response, filterChain); } } private void doHeadersAfter (HttpServletRequest request, HttpServletResponse response, FilterChain filterChain) throws IOException, ServletException { HeaderWriterResponse headerWriterResponse = new HeaderWriterResponse (request, response); HeaderWriterRequest headerWriterRequest = new HeaderWriterRequest (request, headerWriterResponse); try { filterChain.doFilter(headerWriterRequest, headerWriterResponse); } finally { headerWriterResponse.writeHeaders(); } } void writeHeaders (HttpServletRequest request, HttpServletResponse response) { for (HeaderWriter writer : this .headerWriters) { writer.writeHeaders(request, response); } } private List<HeaderWriter> getHeaderWriters () { List<HeaderWriter> writers = new ArrayList <>(); addIfNotNull(writers, this .contentTypeOptions.writer); addIfNotNull(writers, this .xssProtection.writer); addIfNotNull(writers, this .cacheControl.writer); addIfNotNull(writers, this .hsts.writer); addIfNotNull(writers, this .frameOptions.writer); addIfNotNull(writers, this .hpkp.writer); addIfNotNull(writers, this .contentSecurityPolicy.writer); addIfNotNull(writers, this .referrerPolicy.writer); addIfNotNull(writers, this .featurePolicy.writer); addIfNotNull(writers, this .permissionsPolicy.writer); addIfNotNull(writers, this .crossOriginOpenerPolicy.writer); addIfNotNull(writers, this .crossOriginEmbedderPolicy.writer); addIfNotNull(writers, this .crossOriginResourcePolicy.writer); writers.addAll(this .headerWriters); return writers; }
5.CorsFilter 跨域相关的过滤器。
核心代码:
1
2
3
4
5
6
7
8
9
10
11
12
13
protected void doFilterInternal (HttpServletRequest request, HttpServletResponse response, FilterChain filterChain) throws ServletException, IOException { CorsConfiguration corsConfiguration = this .configSource.getCorsConfiguration(request); boolean isValid = this .processor.processRequest(corsConfiguration, request, response); if (!isValid || CorsUtils.isPreFlightRequest(request)) { return ; } filterChain.doFilter(request, response); }
6.LogoutFilter 注销过滤器,专门用于处理注销请求 ,默认处理的请求路径为/logout,否则则跳过此过滤器。
核心代码:
1
2
3
4
5
6
7
8
9
10
11
12
13
14
15
16
17
18
19
20
21
22
23
24
25
26
private void doFilter (HttpServletRequest request, HttpServletResponse response, FilterChain chain) throws IOException, ServletException { if (requiresLogout(request, response)) { Authentication auth = SecurityContextHolder.getContext().getAuthentication(); this .handler.logout(request, response, auth); this .logoutSuccessHandler.onLogoutSuccess(request, response, auth); return ; } chain.doFilter(request, response); } protected boolean requiresLogout (HttpServletRequest request, HttpServletResponse response) { if (this .logoutRequestMatcher.matches(request)) { return true ; } 。。。日志 return false ; }
7.ConcurrentSessionFilter 用于同步SessionRegistry中注册的SessionInformation状态。1.从SessionRegistry获取 SessionInformation并检查是否过期2.每次请求就更新sessioninformation的时间。SessionRegistry默认使用内存对象 SessionRegistryImpl ,它是一个监听器监听session相关的事件然后注册到其内部。
核心代码:
1
2
3
4
5
6
7
8
9
10
11
12
13
14
15
16
17
18
19
20
21
22
23
24
private void doFilter (HttpServletRequest request, HttpServletResponse response, FilterChain chain) throws IOException, ServletException { HttpSession session = request.getSession(false ); if (session != null ) { SessionInformation info = this .sessionRegistry.getSessionInformation(session.getId()); if (info != null ) { if (info.isExpired()) { 。。。日志 doLogout(request, response); 。。。发布登出事件 return ; } this .sessionRegistry.refreshLastRequest(info.getSessionId()); } } chain.doFilter(request, response); }
8.UsernamePasswordAuthenticationFilter 处理用户以及密码认证 的核心过滤器。认证请求提交的username 和 password 被封装成 UsernamePasswordAuthenticationToken 进行一系列的认证。 UsernamePasswordAuthenticationToken 实际上就是 Authentication 类型。
过滤器默认只会处理 /login POST 请求 ,可以配置请求路径。
核心代码:
1
2
3
4
5
6
7
8
9
10
11
12
13
14
15
16
17
18
19
20
21
22
23
24
25
26
27
28
29
30
31
32
33
34
35
public void doFilter (ServletRequest request, ServletResponse response, FilterChain chain) throws IOException, ServletException { doFilter((HttpServletRequest) request, (HttpServletResponse) response, chain); } private void doFilter (HttpServletRequest request, HttpServletResponse response, FilterChain chain) throws IOException, ServletException { if (!requiresAuthentication(request, response)) { chain.doFilter(request, response); return ; } try { Authentication authenticationResult = attemptAuthentication(request, response); if (authenticationResult == null ) { return ; } 。。。 if (this .continueChainBeforeSuccessfulAuthentication) { chain.doFilter(request, response); } successfulAuthentication(request, response, chain, authenticationResult); } catch (InternalAuthenticationServiceException failed) { unsuccessfulAuthentication(request, response, failed); } catch (AuthenticationException ex) { unsuccessfulAuthentication(request, response, ex); } }
4.1.doFilter方法 AbstractAuthenticationProcessingFilter类有过滤器方法doFilter来过滤处理post方式的/login请求。
方法来源:由UsernamePasswordAuthenticationFilter组件直接调用,但本类没有此方法,调用继承的父类AbstractAuthenticationProcessingFilter方法。
方法逻辑:判断是否需要过滤、尝试认证、设置会话、认证成功处理
1 2 3 4 5 6 7 8 9 10 11 12 13 14 15 16 17 18 19 20 21 22 23 24 25 26 27 28 @Override public void doFilter (ServletRequest request, ServletResponse response, FilterChain chain) throws IOException, ServletException { doFilter((HttpServletRequest) request, (HttpServletResponse) response, chain); } private void doFilter (HttpServletRequest request, HttpServletResponse response, FilterChain chain) throws IOException, ServletException { if (!requiresAuthentication(request, response)) { chain.doFilter(request, response); return ; } Authentication authenticationResult = attemptAuthentication(request, response); if (authenticationResult == null ) { return ; } this .sessionStrategy.onAuthentication(authenticationResult, request, response); if (this .continueChainBeforeSuccessfulAuthentication) { chain.doFilter(request, response); } successfulAuthentication(request, response, chain, authenticationResult); }
调用的比较重要的方法:
attemptAuthentication
successfulAuthentication
4.2.attemptAuthentication方法 UsernamePasswordAuthenticationFilter类通过attemptAuthentication方法来尝试认证,本质是认证前的一些处理并委托给authenticationManager进行认证。
方法来源:UsernamePasswordAuthenticationFilter类的doFilter调用。
方法逻辑:只处理post的认证请求,从请求中解析出用户名和密码,并使用UsernamePasswordAuthenticationToken类封装作为认证令牌,传入认证令牌并委托authenticationManager 的authenticate方法进行认证。
1 2 3 4 5 6 7 8 9 10 11 12 13 14 15 16 17 18 public Authentication attemptAuthentication (HttpServletRequest request, HttpServletResponse response) throws AuthenticationException { if (this .postOnly && !request.getMethod().equals("POST" )) { throw new AuthenticationServiceException ("Authentication method not supported: " + request.getMethod()); } String username = obtainUsername(request); String password = obtainPassword(request); UsernamePasswordAuthenticationToken authRequest = new UsernamePasswordAuthenticationToken (username, password); setDetails(request, authRequest); return this .getAuthenticationManager().authenticate(authRequest); }
4.3.ProviderManager类authenticate方法 ProviderManager类是==AuthenticationManager接口==的默认实现类,通过authenticate方法来实现多种认证方式尝试认证。
方法来源:来源于ProviderManager类,但UsernamePasswordAuthenticationFilter类attemptAuthentication方法是通过AuthenticationManager接口调用authenticate方法,故是通过多态 实现了源于ProviderManager类的authenticate方法的调用。
方法逻辑:遍历所有的AuthenticationProvider进行认证provider.authenticate(authentication)。其中默认包含DaoAuthhenticationProvider组件。ProviderManager中管理了诸多用于认证的AuthenticationProvider组件。依据认证令牌的类型来使用不同的AuthenticationProvider(认证登录真正的逻辑) 。这样spring security就通过ProviderManager扩展了登录认证的方式,具有良好的扩展性。
1 2 3 4 5 6 7 8 9 10 11 12 13 14 15 16 17 18 19 20 21 22 23 24 25 26 27 28 29 30 31 32 33 34 35 public Authentication authenticate (Authentication authentication) throws AuthenticationException { Class<? extends Authentication > toTest = authentication.getClass(); Authentication result = null ; Authentication parentResult = null ; for (AuthenticationProvider provider : getProviders()) { if (!provider.supports(toTest)) { continue ; } result = provider.authenticate(authentication); if (result != null ) { copyDetails(authentication, result); break ; } } if (result == null && this .parent != null ) { parentResult = this .parent.authenticate(authentication); result = parentResult; } if (result != null ) { if (this .eraseCredentialsAfterAuthentication && (result instanceof CredentialsContainer)) { ((CredentialsContainer) result).eraseCredentials(); } return result; } throw lastException; }
4.4.AbstractUserDetailsAuthenticationProvider类authenticate方法 AbstractUserDetailsAuthenticationProvider类authenticate方法功能是登录认证使用数据库来认证用户名和密码。
方法来源:直接调用者是DaoAuthhenticationProvider组件。其继承了AbstractUserDetailsAuthenticationProvider,由于没有authenticate方法在本类中所以使用继承的父类authenticate方法。
方法逻辑:先从令牌中提取username,然后提供了用户信息本地缓存机制,然后查询数据库,然后检查查询到的结果(检查用户状态、检查密码、检查密码状态),然后添加缓存,然后按需求返回。
1 2 3 4 5 6 7 8 9 10 11 12 13 14 15 16 17 18 19 20 21 22 public Authentication authenticate (Authentication authentication) throws AuthenticationException { String username = determineUsername(authentication); boolean cacheWasUsed = true ; UserDetails user = this .userCache.getUserFromCache(username); if (user == null ) { cacheWasUsed = false ; user = retrieveUser(username, (UsernamePasswordAuthenticationToken) authentication); } this .preAuthenticationChecks.check(user); additionalAuthenticationChecks(user, (UsernamePasswordAuthenticationToken) authentication); this .postAuthenticationChecks.check(user); if (!cacheWasUsed) { this .userCache.putUserInCache(user); } Object principalToReturn = user; if (this .forcePrincipalAsString) { principalToReturn = user.getUsername(); } return createSuccessAuthentication(principalToReturn, authentication, user); }
调用的重要方法:
retrieveUser
preAuthenticationChecks.check
additionalAuthenticationChecks
postAuthenticationChecks.check
createSuccessAuthentication
4.5.retrieveUser方法 DaoAuthhenticationProvider中提供了查询数据库的方法retrieveUser。
方法来源:DaoAuthhenticationProvider组件。由AbstractUserDetailsAuthenticationProvider类authenticate方法调用。
方法逻辑:定时攻击保护、委托给UserDetailsService组件进行数据库查询 包括用户信息和用户权限、用户名是否存在检查。
1 2 3 4 5 6 7 8 9 10 11 12 protected final UserDetails retrieveUser (String username, UsernamePasswordAuthenticationToken authentication) throws AuthenticationException { prepareTimingAttackProtection(); try { UserDetails loadedUser = this .getUserDetailsService().loadUserByUsername(username); if (loadedUser == null ) { throw new InternalAuthenticationServiceException ("..." ); } return loadedUser; } }
4.6.createSuccessAuthentication方法 DaoAuthhenticationProvider中提供了依据查询结果封装为Authentication认证后主体的方法createSuccessAuthentication。
方法来源:直接来源DaoAuthhenticationProvider,但同时方法本身调用了父类AbstractUserDetailsAuthenticationProvider的createSuccessAuthentication来最终生成Authentication。由(被)AbstractUserDetailsAuthenticationProvider类authenticate方法调用。
方法逻辑:1.依据查询到的userDetail创建认证后主体。2.设置认证后主体details。3.返回认证后主体。
1 2 3 4 5 6 7 8 9 10 11 12 13 14 15 16 17 18 19 protected Authentication createSuccessAuthentication (Object principal, Authentication authentication,UserDetails user) { return super .createSuccessAuthentication(principal, authentication, user); } protected Authentication createSuccessAuthentication (Object principal, Authentication authentication,UserDetails user) { UsernamePasswordAuthenticationToken result = new UsernamePasswordAuthenticationToken (principal, authentication.getCredentials(), this .authoritiesMapper.mapAuthorities(user.getAuthorities())); result.setDetails(authentication.getDetails()); this .logger.debug("Authenticated user" ); return result; }
4.7.successfulAuthentication方法 AbstractAuthenticationProcessingFilter类有方法successfulAuthentication来处理认证成功。
方法来源:AbstractAuthenticationProcessingFilter类。由AbstractAuthenticationProcessingFilter类的doFilter方法调用。
方法逻辑:1.初始化设置SecurityContextHolder和SecurityContext。2.通知rememberMeServices服务认证成功。3.发布认证成功消息。4.委托给AuthenticationSuccessHandler来处理认证成功。
1 2 3 4 5 6 7 8 9 10 11 12 13 14 15 16 17 18 19 private AuthenticationSuccessHandler successHandler = new SavedRequestAwareAuthenticationSuccessHandler ();protected void successfulAuthentication (HttpServletRequest request, HttpServletResponse response, FilterChain chain,Authentication authResult) throws IOException, ServletException { SecurityContext context = SecurityContextHolder.createEmptyContext(); context.setAuthentication(authResult); SecurityContextHolder.setContext(context); this .rememberMeServices.loginSuccess(request, response, authResult); if (this .eventPublisher != null ) { this .eventPublisher.publishEvent(new InteractiveAuthenticationSuccessEvent (authResult, this .getClass())); } this .successHandler.onAuthenticationSuccess(request, response, authResult); }
4.8.子类onAuthenticationSuccess方法 SavedRequestAwareAuthenticationSuccessHandler类有方法onAuthenticationSuccess来处理认证成功。具体处理的是解析重定向到哪个url 。即:认证后重定向到认证前url问题。
方法来源:SavedRequestAwareAuthenticationSuccessHandler类。由AbstractAuthenticationProcessingFilter类successfulAuthentication方法调用。
方法逻辑:1.获取对应认证请求缓存的认证前请求(即要访问的未认证请求)。2.没有缓存,调用父类方法返回配置的重定向url。3.是否配置重定向url在请求参数中或配置使用默认重定向url。调用父类方法返回配置的重定向url。4.获取缓存的重定向地址。5.重定向。总结:若从认证页面进行认证,则直接依据配置的默认重定向地址进行重定向;从未认证页面进行认证,则会重定向到未认证页面。
1 2 3 4 5 6 7 8 9 10 11 12 13 14 15 16 17 18 19 20 21 22 23 24 public void onAuthenticationSuccess (HttpServletRequest request, HttpServletResponse response,Authentication authentication) throws ServletException, IOException { SavedRequest savedRequest = this .requestCache.getRequest(request, response); if (savedRequest == null ) { super .onAuthenticationSuccess(request, response, authentication); return ; } String targetUrlParameter = getTargetUrlParameter(); if (isAlwaysUseDefaultTargetUrl() || (targetUrlParameter != null && StringUtils.hasText(request.getParameter(targetUrlParameter)))) { this .requestCache.removeRequest(request, response); super .onAuthenticationSuccess(request, response, authentication); return ; } clearAuthenticationAttributes(request); String targetUrl = savedRequest.getRedirectUrl(); getRedirectStrategy().sendRedirect(request, response, targetUrl); }
4.9.父类onAuthenticationSuccess方法 父类onAuthenticationSuccess方法源码解析:
1 2 3 4 5 6 7 8 9 10 11 12 13 14 15 16 17 18 19 20 21 22 23 24 25 26 27 28 29 30 31 32 33 34 35 36 37 38 39 40 41 42 43 44 45 46 public class SimpleUrlAuthenticationSuccessHandler extends AbstractAuthenticationTargetUrlRequestHandler implements AuthenticationSuccessHandler { public void onAuthenticationSuccess (HttpServletRequest request, HttpServletResponse response,Authentication authentication) throws IOException, ServletException { handle(request, response, authentication); clearAuthenticationAttributes(request); } } protected void handle (HttpServletRequest request, HttpServletResponse response, Authentication authentication) throws IOException, ServletException { String targetUrl = determineTargetUrl(request, response, authentication); this .redirectStrategy.sendRedirect(request, response, targetUrl); } protected String determineTargetUrl (HttpServletRequest request, HttpServletResponse response,Authentication authentication) { return determineTargetUrl(request, response); } protected String determineTargetUrl (HttpServletRequest request, HttpServletResponse response) { if (isAlwaysUseDefaultTargetUrl()) { return this .defaultTargetUrl; } String targetUrl = null ; if (this .targetUrlParameter != null ) { targetUrl = request.getParameter(this .targetUrlParameter); if (StringUtils.hasText(targetUrl)) { return targetUrl; } } if (this .useReferer && !StringUtils.hasLength(targetUrl)) { targetUrl = request.getHeader("Referer" ); } if (!StringUtils.hasText(targetUrl)) { targetUrl = this .defaultTargetUrl; } return targetUrl; }
4.10.详细的认证流程时序图
HttpSecurity.formLogin()注入过滤器,实现了指定路径认证过滤其它路径跳过此过滤器。
9.RequestCacheAwareFilter 用于缓存未认证成功的请求 。且默认只能缓存 GET 类型请求 ,在异常处理过滤器中执行缓存,在账号密码登录过滤器认证成功时使用缓存重定向到缓存的请求。
核心代码:
1
2
3
4
5
6
7
public void doFilter (ServletRequest request, ServletResponse response, FilterChain chain) throws IOException, ServletException { HttpServletRequest wrappedSavedRequest = this .requestCache.getMatchingRequest((HttpServletRequest) request, (HttpServletResponse) response); chain.doFilter((wrappedSavedRequest != null ) ? wrappedSavedRequest : request, response); }
10.SecurityContextHolderAwareRequestFilter 包装原始请求和响应对象生成一个新的请求对象。增强了请求对象的能力 、增加了功能。
核心代码:
1
2
3
4
5
6
7
8
9
10
11
12
13
14
15
16
17
18
19
20
21
22
23
24
25
public void doFilter (ServletRequest req, ServletResponse res, FilterChain chain) throws IOException, ServletException { chain.doFilter(this .requestFactory.create((HttpServletRequest) req, (HttpServletResponse) res), res); } @Override public void afterPropertiesSet () throws ServletException { super .afterPropertiesSet(); updateFactory(); } private void updateFactory () { String rolePrefix = this .rolePrefix; this .requestFactory = createServlet3Factory(rolePrefix); } private HttpServletRequestFactory createServlet3Factory (String rolePrefix) { HttpServlet3RequestFactory factory = new HttpServlet3RequestFactory (rolePrefix); factory.setTrustResolver(this .trustResolver); factory.setAuthenticationEntryPoint(this .authenticationEntryPoint); factory.setAuthenticationManager(this .authenticationManager); factory.setLogoutHandlers(this .logoutHandlers); return factory; }
11.RememberMeAuthenticationFilter 记住我认证过滤器。
核心代码:
1
2
3
4
5
6
7
8
9
10
11
12
13
14
15
16
17
18
19
20
21
22
23
24
25
26
27
28
29
30
31
32
33
34
35
36
37
38
39
40
private void doFilter (HttpServletRequest request, HttpServletResponse response, FilterChain chain) throws IOException, ServletException { if (SecurityContextHolder.getContext().getAuthentication() != null ) { 。。。日志 chain.doFilter(request, response); return ; } Authentication rememberMeAuth = this .rememberMeServices.autoLogin(request, response); if (rememberMeAuth != null ) { try { rememberMeAuth = this .authenticationManager.authenticate(rememberMeAuth); SecurityContext context = SecurityContextHolder.createEmptyContext(); context.setAuthentication(rememberMeAuth); SecurityContextHolder.setContext(context); onSuccessfulAuthentication(request, response, rememberMeAuth); 。。。日志 this .securityContextRepository.saveContext(context, request, response); 。。。发布事件 if (this .successHandler != null ) { this .successHandler.onAuthenticationSuccess(request, response, rememberMeAuth); return ; } } catch (AuthenticationException ex) { 。。。日志 this .rememberMeServices.loginFail(request, response); onUnsuccessfulAuthentication(request, response, ex); } } chain.doFilter(request, response); }
已认证跳过,rememberMeServices.autoLogin(request, response)返回空跳过,否组执行rememberMe认证。
12.AnonymousAuthenticationFilter 匿名登录认证过滤器,未认证设置一个匿名认证对象到SecurityContextHolder。
核心代码:
1
2
3
4
5
6
7
8
9
10
11
12
13
14
15
16
public void doFilter (ServletRequest req, ServletResponse res, FilterChain chain) throws IOException, ServletException { if (SecurityContextHolder.getContext().getAuthentication() == null ) { Authentication authentication = createAuthentication((HttpServletRequest) req); SecurityContext context = SecurityContextHolder.createEmptyContext(); context.setAuthentication(authentication); SecurityContextHolder.setContext(context); 。。。日志 } else { 。。。日志 } chain.doFilter(req, res); }
13.SessionManagementFilter Session 管理器过滤器,内部维护了一个SessionAuthenticationStrategy 用于管理 Session。
核心代码:
1
2
3
4
5
6
7
8
9
10
11
12
13
14
15
16
17
18
19
20
21
22
23
24
25
26
27
28
29
30
31
32
33
34
35
36
37
38
39
40
41
42
private void doFilter (HttpServletRequest request, HttpServletResponse response, FilterChain chain) throws IOException, ServletException { if (request.getAttribute(FILTER_APPLIED) != null ) { chain.doFilter(request, response); return ; } request.setAttribute(FILTER_APPLIED, Boolean.TRUE); if (!this .securityContextRepository.containsContext(request)) { Authentication authentication = SecurityContextHolder.getContext().getAuthentication(); if (authentication != null && !this .trustResolver.isAnonymous(authentication)) { try { this .sessionAuthenticationStrategy.onAuthentication(authentication, request, response); } catch (SessionAuthenticationException ex) { SecurityContextHolder.clearContext(); this .failureHandler.onAuthenticationFailure(request, response, ex); return ; } this .securityContextRepository.saveContext(SecurityContextHolder.getContext(), request, response); } else { if (request.getRequestedSessionId() != null && !request.isRequestedSessionIdValid()) { 。。。日志 if (this .invalidSessionStrategy != null ) { this .invalidSessionStrategy.onInvalidSessionDetected(request, response); return ; } } } } chain.doFilter(request, response); }
对会话相关进行处理。只有当前请求没有存储 securityContext 时才会进行会话处理。即是否存储好 securityContext 到会话级别标志着会话是否进行了处理 。
认证会话处理可以包括许多内容:如更改会话id防止攻击、检查会话对象是否存在、同一用户多个会话处理等等。
14.ExceptionTranslationFilter 主要来捕获异常进行合理的处理 ,传输异常事件。
核心代码:
1
2
3
4
5
6
7
8
9
10
11
12
13
14
15
16
17
18
19
20
21
22
23
24
25
26
27
28
29
private void doFilter (HttpServletRequest request, HttpServletResponse response, FilterChain chain) throws IOException, ServletException { try { chain.doFilter(request, response); } catch (IOException ex) { throw ex; } catch (Exception ex) { 。。。 handleSpringSecurityException(request, response, chain, securityException); } } private void handleSpringSecurityException (HttpServletRequest request, HttpServletResponse response, FilterChain chain, RuntimeException exception) throws IOException, ServletException { if (exception instanceof AuthenticationException) { handleAuthenticationException(request, response, chain, (AuthenticationException) exception); } else if (exception instanceof AccessDeniedException) { handleAccessDeniedException(request, response, chain, (AccessDeniedException) exception); } }
合理的异常响应返回需要我们配置AuthenticationEntryPoint、AccessDeniedHandler组件。
15.FilterSecurityInterceptor(重点) 过滤web请求并在拒绝请求时抛出异常 。这个过滤器 决定了访问特定路径 应该具备的权限,如果要实现动态权限控制就必须研究该类 。只处理过滤器层面的权限控制,并不处理注解AOP层面的权限控制 。
其主要过程为:拦截Authentication对”secured object”的访问,依据“安全元信息属性 ”列表来决定Authentication对象是否可以访问”secured object”。
核心代码:
1
2
3
4
5
6
7
8
9
10
11
12
13
14
15
16
17
18
19
20
21
22
23
24
25
26
27
28
public void doFilter (ServletRequest request, ServletResponse response, FilterChain chain) throws IOException, ServletException { invoke(new FilterInvocation (request, response, chain)); } public void invoke (FilterInvocation filterInvocation) throws IOException, ServletException { if (isApplied(filterInvocation) && this .observeOncePerRequest) { filterInvocation.getChain().doFilter(filterInvocation.getRequest(), filterInvocation.getResponse()); return ; } if (filterInvocation.getRequest() != null && this .observeOncePerRequest) { filterInvocation.getRequest().setAttribute(FILTER_APPLIED, Boolean.TRUE); } InterceptorStatusToken token = super .beforeInvocation(filterInvocation); try { filterInvocation.getChain().doFilter(filterInvocation.getRequest(), filterInvocation.getResponse()); } finally { super .finallyInvocation(token); } super .afterInvocation(token, null ); }
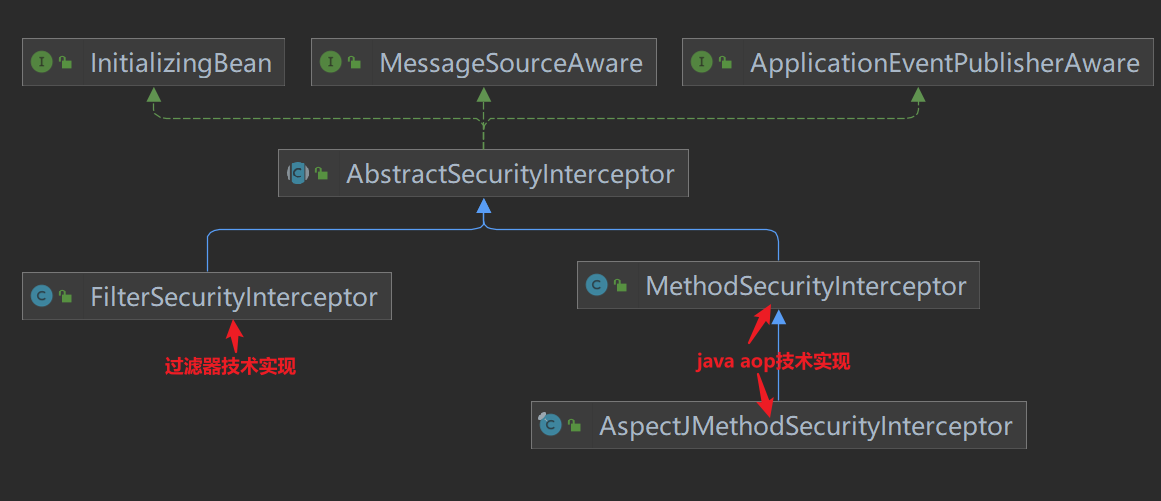
AbstractSecurityInterceptor中已经规划了安全控制过程的抽象FilterSecurityInterceptor是针对web request 的基于filter技术实现,MethodSecurityInterceptor和AspectJMethodSecurityInterceptor是针对method invocation 的基于两种java aop技术实现。
组件关系类图如下:
AbstractSecurityInterceptor中的抽象过程基本如下
寻找关联当前“secure object”的配置属性(“configuration attributes”)
把authentication\secure object\configuration attributes提交给AccessDecisionManager.decide() 可以在此机会对Authentication对象进行变更
如果授权成功,则允许请求\调用继续往下进行
如果配置了AfterInvocaitonManager,那么就调用该管理器的相关操作
而 AccessDecisionManager.decide()又委托给多个Voter去vote(),然后AccessDecisionManager综合意见返回。
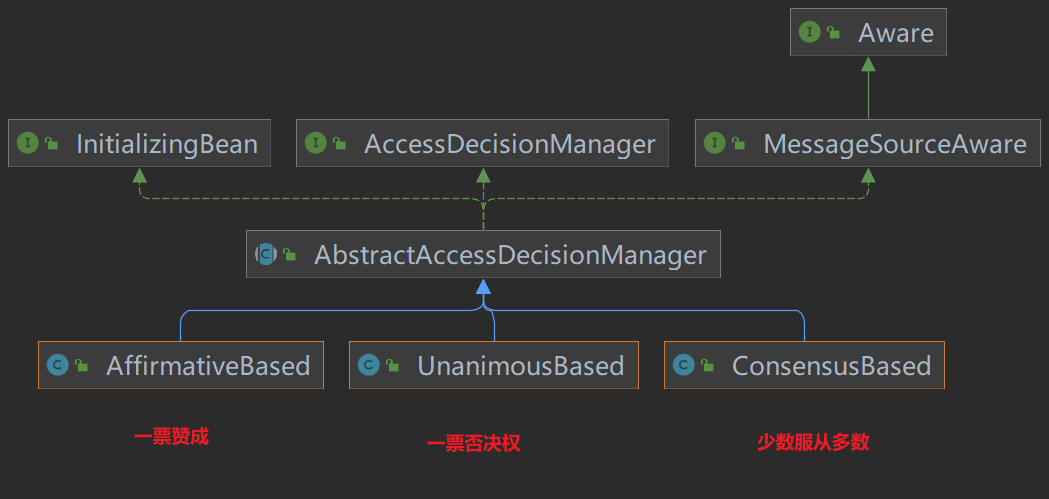
AccessDecisionManager有一个抽象实现类AbstractAccessDecisionManager,这个抽象实现面向了一种vote机制,其中维护了一个vote器列表。
AbstractAccessDecisionManager的子类专注于一件事情:从它的vote器们的vote结果中决定,是否最终给予授权。不同的子类实现了不同的决策策略:
AffirmativeBased:任何一个vote器给予ACCESS_GRANTED,那么最终结果就给予授权;否则不授权;ConsensusBased:按少数服从多数策略,给予授权决定;UnanimousBased:一Piao否决制。注意全部弃权票委托给抽象类方法checkAllowIfAllAbstainDecisions()来处理。
10.1.doFilter方法 FilterSecurityInterceptor类方法doFilter来实现过滤处理。
方法来源:FilterSecurityInterceptor类
方法逻辑:封装一下方法参数为FilterInvocation转发给本类invoke方法处理
1 2 3 4 5 public void doFilter (ServletRequest request, ServletResponse response, FilterChain chain) throws IOException, ServletException { invoke(new FilterInvocation (request, response, chain)); }
10.2.invoke方法 FilterSecurityInterceptor类方法invoke来实现过滤处理。
方法来源:FilterSecurityInterceptor类
方法逻辑:1.检查是否已经经过安全校验(对于该用户的该请求)2.设置请求属性已安全校验3.过滤器访问控制前处理(即处理其它后续过滤器前该过滤器的前处理 )4.放行给下一个过滤器处理5.请求调用后处理6.过滤器后处理
1 2 3 4 5 6 7 8 9 10 11 12 13 14 15 16 17 18 19 20 21 22 23 24 public void invoke (FilterInvocation filterInvocation) throws IOException, ServletException { if (isApplied(filterInvocation) && this .observeOncePerRequest) { filterInvocation.getChain().doFilter(filterInvocation.getRequest(), filterInvocation.getResponse()); return ; } if (filterInvocation.getRequest() != null && this .observeOncePerRequest) { filterInvocation.getRequest().setAttribute(FILTER_APPLIED, Boolean.TRUE); } InterceptorStatusToken token = super .beforeInvocation(filterInvocation); try { filterInvocation.getChain().doFilter(filterInvocation.getRequest(), filterInvocation.getResponse()); } finally { super .finallyInvocation(token); } super .afterInvocation(token, null ); }
调用的重要方法:
beforeInvocation
finallyInvocation
afterInvocation
10.3.beforeInvocation方法(鉴权核心) AbstractSecurityInterceptor类beforeInvocation方法来进行安全检查校验权限。
方法来源:FilterSecurityInterceptor类的父类AbstractSecurityInterceptor。直接由FilterSecurityInterceptor调用super.beforeInvocation来调用父类的方法。
方法逻辑:1.查询获取配置的匹配该请求的权限规则2.无权限规则,则返回null3.校验是否已经认证,未认证抛出异常4.从SecurityContextHolder获取认证主体5.尝试授权6.返回一个封装SecurityContext、请求的安全规则、请求的InterceptorStatusToken
1 2 3 4 5 6 7 8 9 10 11 12 13 14 15 16 17 18 19 20 21 22 23 24 25 26 27 28 29 30 31 32 33 protected InterceptorStatusToken beforeInvocation (Object object) { Collection<ConfigAttribute> attributes = this .obtainSecurityMetadataSource().getAttributes(object); if (CollectionUtils.isEmpty(attributes)) { publishEvent(new PublicInvocationEvent (object)); return null ; } if (SecurityContextHolder.getContext().getAuthentication() == null ) { credentialsNotFound(this .messages.getMessage("AbstractSecurityInterceptor.authenticationNotFound" ,"An Authentication object was not found in the SecurityContext" ), object, attributes); } Authentication authenticated = authenticateIfRequired(); attemptAuthorization(object, attributes, authenticated); if (this .publishAuthorizationSuccess) { publishEvent(new AuthorizedEvent (object, attributes, authenticated)); } Authentication runAs = this .runAsManager.buildRunAs(authenticated, object, attributes); if (runAs != null ) { SecurityContext origCtx = SecurityContextHolder.getContext(); SecurityContext newCtx = SecurityContextHolder.createEmptyContext(); newCtx.setAuthentication(runAs); SecurityContextHolder.setContext(newCtx); return new InterceptorStatusToken (origCtx, true , attributes, object); } return new InterceptorStatusToken (SecurityContextHolder.getContext(), false , attributes, object); }
调用的重要方法:
getAttributes
attemptAuthorization
10.4.getAttributes方法 DefaultFilterInvocationSecurityMetadataSource类方法getAttributes来获取配置的该请求映射的安全规则集合。
方法来源:直接来源于DefaultFilterInvocationSecurityMetadataSource类。但由AbstractSecurityInterceptor类beforeInvocation方法调用,且调用时是基于SecurityMetadataSource接口 调用具有多态 的特性。默认使用该DefaultFilterInvocationSecurityMetadataSource类。
方法逻辑:1.获取请求2.遍历requestMap(代码生成)获取匹配该请求的权限规则3.没有相关权限规则返回null
1 2 3 4 5 6 7 8 9 10 11 12 13 14 15 16 17 18 19 20 public Collection<ConfigAttribute> getAttributes (Object object) { final HttpServletRequest request = ((FilterInvocation) object).getRequest(); int count = 0 ; for (Map.Entry<RequestMatcher, Collection<ConfigAttribute>> entry : this .requestMap.entrySet()) { if (entry.getKey().matches(request)) { return entry.getValue(); } else { if (this .logger.isTraceEnabled()) { this .logger.trace(LogMessage.format("Did not match request to %s - %s (%d/%d)" , entry.getKey(), entry.getValue(), ++count, this .requestMap.size())); } } } return null ; }
10.5attemptAuthorization方法 AbstractSecurityInterceptor类方法attemptAuthorization来委托accessDecisionManager进行权限检查 ,即比对用户拥有的权限和访问该方法需要符合的安全规则。无权限就抛异常结束过滤器的处理 。
方法来源:AbstractSecurityInterceptor类,由AbstractSecurityInterceptor类beforeInvocation方法调用。
方法逻辑:1.委托accessDecisionManager进行授权决策,无法授权就抛出异常2.异常时打印日志3.异常时发布授权失败消息4.再次抛出原异常
1 2 3 4 5 6 7 8 9 10 11 12 13 14 15 16 17 18 19 20 21 22 23 private void attemptAuthorization (Object object, Collection<ConfigAttribute> attributes, Authentication authenticated) { try { this .accessDecisionManager.decide(authenticated, object, attributes); } catch (AccessDeniedException ex) { if (this .logger.isTraceEnabled()) { this .logger.trace(LogMessage.format("Failed to authorize %s with attributes %s using %s" , object, attributes, this .accessDecisionManager)); } else if (this .logger.isDebugEnabled()) { this .logger.debug(LogMessage.format("Failed to authorize %s with attributes %s" , object, attributes)); } publishEvent(new AuthorizationFailureEvent (object, attributes, authenticated, ex)); throw ex; } }
10.6.decide方法 AffirmativeBased类方法decide来进行授权决策(几个投票者如何投票代表成功授权),即解析该主体对该请求的访问权限。而AffirmativeBased是一种解析策略。
方法来源:默认调用AffirmativeBased类的decide。但此方法是源于AbstractSecurityInterceptor的attemptAuthorization方法调用,调用也是基于AccessDecisionManager接口 调用,即this.accessDecisionManager.decide。
方法逻辑:1.遍历所有DecisionVoters来让它们投票,一旦有人投赞成票则授权成功(即有一种类型的配置权限合法)2.没有赞成票时,否定票>0,授权失败抛出异常3.所有人弃权,依据配置AllowIfAllAbstainDecisions来决定是否授权成功
1
2
3
4
5
6
7
8
9
10
11
12
13
14
15
16
17
18
19
20
21
22
23
public void decide (Authentication authentication, Object object, Collection<ConfigAttribute> configAttributes) throws AccessDeniedException { int deny = 0 ; for (AccessDecisionVoter voter : getDecisionVoters()) { int result = voter.vote(authentication, object, configAttributes); switch (result) { case AccessDecisionVoter.ACCESS_GRANTED: return ; case AccessDecisionVoter.ACCESS_DENIED: deny++; break ; default : break ; } } if (deny > 0 ) { throw new AccessDeniedException ( this .messages.getMessage("AbstractAccessDecisionManager.accessDenied" , "Access is denied" )); } checkAllowIfAllAbstainDecisions(); }
AffirmativeBased默认包括的所有voters :
PreInvocationAuthorizationAdviceVoter
RoleVoter
AuthenticatedVoter
重要调用方法:voter.vote
10.7.vote方法 WebExpressionVoter类方法vote会执行真正的权限投票(权限对比检查)。
注意:在WebSecurityConfigurerAdapter子类配置的权限规则 会被封装为WebExpressionConfigAttribute由WebExpressionVoter 来进行处理;注解配置的权限规则 会被封装成PreInvocationAttribute由PreInvocationAuthorizationAdviceVoter 来进行处理;带“ROLE_”前缀的会被RoleVoter 进行处理。
方法来源:WebExpressionVoter类。由AffirmativeBased类的decide方法调用。基于接口AccessDecisionVoter调用。
方法逻辑:1.从权限规则集合中提取该投票者能处理的权限规则2.没找到符合的返回弃权(没有使用该方法配置权限)3.构造EL表达式上下文4.使用ExpressionUtils工具类来判断EL表达式的值5.EL表达式为true返回授权成功6.否则返回授权失败
1 2 3 4 5 6 7 8 9 10 11 12 13 14 15 16 17 18 19 20 21 22 23 24 25 26 27 28 29 30 31 32 public int vote (Authentication authentication, FilterInvocation filterInvocation, Collection<ConfigAttribute> attributes) { WebExpressionConfigAttribute webExpressionConfigAttribute = findConfigAttribute(attributes); if (webExpressionConfigAttribute == null ) { return ACCESS_ABSTAIN; } EvaluationContext ctx = webExpressionConfigAttribute.postProcess( this .expressionHandler.createEvaluationContext(authentication, filterInvocation), filterInvocation); boolean granted = ExpressionUtils.evaluateAsBoolean(webExpressionConfigAttribute.getAuthorizeExpression(), ctx); if (granted) { return ACCESS_GRANTED; } this .logger.trace("Voted to deny authorization" ); return ACCESS_DENIED; } private WebExpressionConfigAttribute findConfigAttribute (Collection<ConfigAttribute> attributes) { for (ConfigAttribute attribute : attributes) { if (attribute instanceof WebExpressionConfigAttribute) { return (WebExpressionConfigAttribute) attribute; } } return null ; }
10.8.finallyInvocation方法 AbstractSecurityInterceptor类方法finallyInvocation来处理是否更新SecurityContext。该方法只要通过了授权就会被调用,即使请求调用抛出了异常。
方法来源:AbstractSecurityInterceptor类,由FilterSecurityInterceptor调用super.beforeInvocation来调用父类的方法。
方法逻辑:授权后令牌不为null且isContextHolderRefreshRequired设置为true时更新ecurityContext
1 2 3 4 5 6 7 8 9 10 11 protected void finallyInvocation (InterceptorStatusToken token) { if (token != null && token.isContextHolderRefreshRequired()) { SecurityContextHolder.setContext(token.getSecurityContext()); if (this .logger.isDebugEnabled()) { this .logger.debug(LogMessage.of( () -> "Reverted to original authentication " + token.getSecurityContext().getAuthentication())); } } }
10.9.afterInvocation方法 AbstractSecurityInterceptor类方法afterInvocation来进行过滤器后处理。
方法来源:AbstractSecurityInterceptor类,由FilterSecurityInterceptor调用super.afterInvocation来调用父类的方法。
方法逻辑:1.若无需权限就直接返回null无处理2.清理SecurityContext3.若afterInvocationManager存在,委托afterInvocationManager进行过滤器后处理
1 2 3 4 5 6 7 8 9 10 11 12 13 14 15 16 17 18 19 20 21 22 23 24 25 protected Object afterInvocation (InterceptorStatusToken token, Object returnedObject) { if (token == null ) { return returnedObject; } finallyInvocation(token); if (this .afterInvocationManager != null ) { try { returnedObject = this .afterInvocationManager.decide(token.getSecurityContext().getAuthentication(), token.getSecureObject(), token.getAttributes(), returnedObject); } catch (AccessDeniedException ex) { publishEvent(new AuthorizationFailureEvent (token.getSecureObject(), token.getAttributes(), token.getSecurityContext().getAuthentication(), ex)); throw ex; } } return returnedObject; }
10.10.详细的授权流程时序图 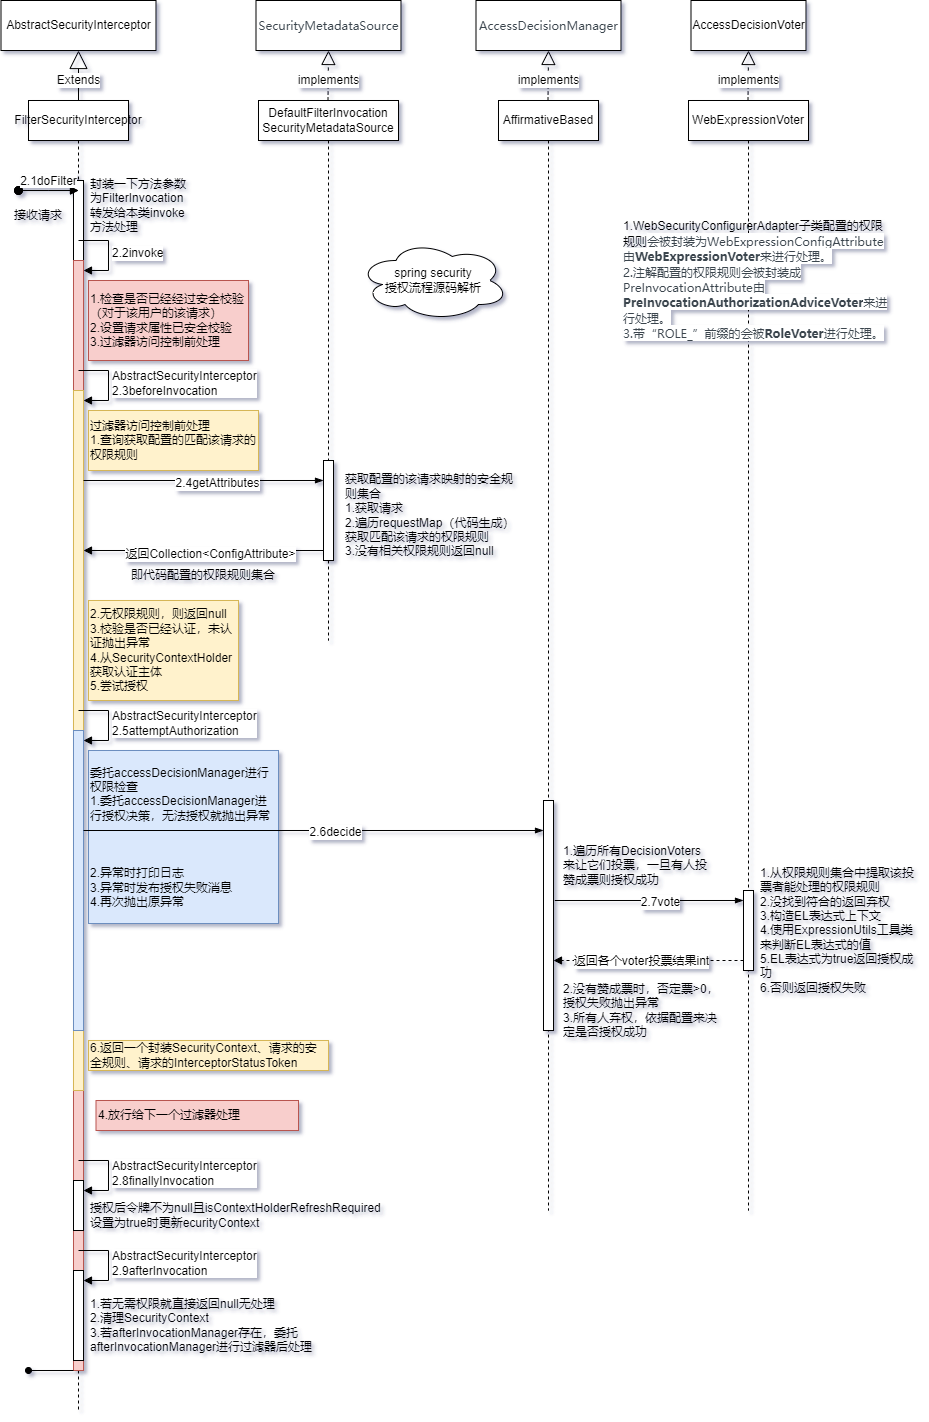
FilterSecurityInterceptor过滤器原理为servlet过滤器,实现了请求路径过滤器层面的权限控制,请求路径权限配置来源于Spring Security的配置类。
16.MethodSecurityInterceptor(重点) 拦截方法调用并在拒绝请求时抛出异常 。这个拦截器 决定了访问特定方法 应具备的权限,如果要实现动态权限控制就必须研究该类。
只处理注解AOP层面的权限控制,不处理过滤器层面的权限控制 。
核心代码:
1
2
3
4
5
6
7
8
9
10
11
12
13
14
15
16
@Override public Object invoke (MethodInvocation mi) throws Throwable { InterceptorStatusToken token = super .beforeInvocation(mi); Object result; try { result = mi.proceed(); } finally { super .finallyInvocation(token); } return super .afterInvocation(token, result); }
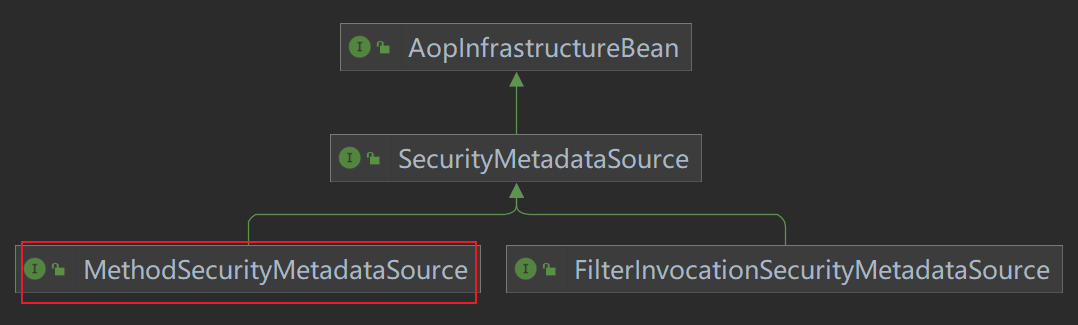
与 FilterSecurityInterceptor 继承的同一个父类 AbstractSecurityInterceptor 。其逻辑源码与 FilterSecurityInterceptor 几乎一样,但是其 SecurityMetadataSource 的真实类型与之不同,是 MethodSecurityMetadataSource 类型。类图如下:
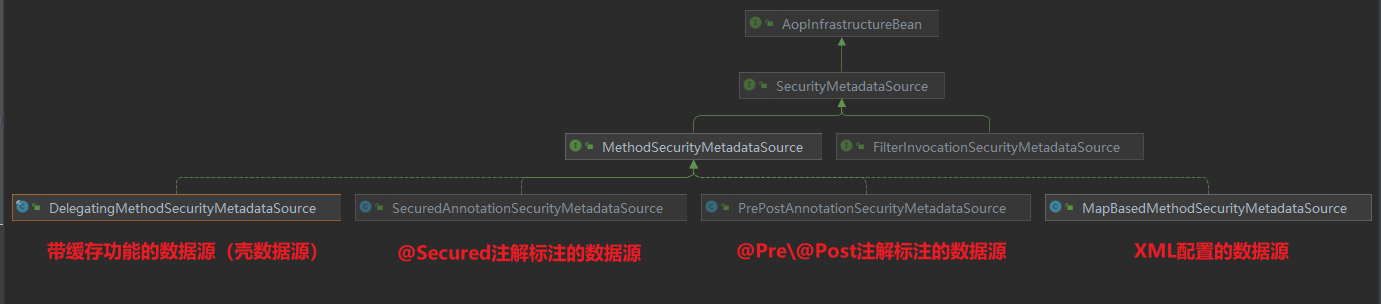
即拦截器的权限数据源 与FilterSecurityInterceptor 过滤器的数据源不同,拦截器的权限数据源来源于方法上的注解 。总结拦截器数据源有如下四种 :
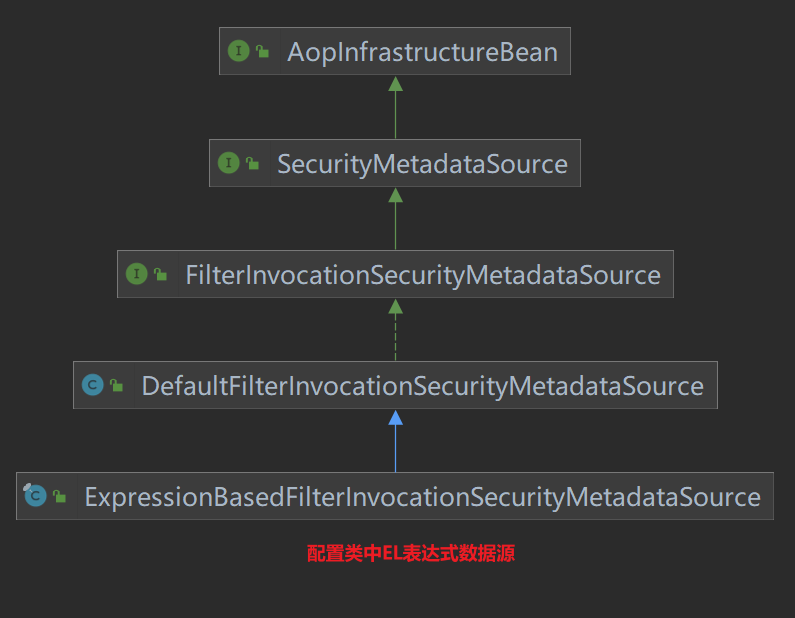
而过滤器数据源 只有一种 :ExpressionBasedFilterInvocationSecurityMetadataSource
以上拦截器 MethodSecurityInterceptor 与 MethodSecurityMetadataSource 都是由 GlobalMethodSecurityConfiguration 配置类装配到IOC容器的。源码比较多,这里就不分析了还是比较简单。
MethodSecurityInterceptor拦截器原理为AOP,实现了方法层面的权限控制,方法权限配置来源于注解和xml配置文件。
二、注解解析 1.EnableWebSecurity 在非Springboot的应用中,该注解@EnableWebSecurity需要开发人员自己引入以启用Web安全。
在Springboot的应用中,开发人员没有必要再次引用该注解 ,Springboot的自动配置机制WebSecurityEnablerConfiguration已经引入了该注解。
@EnableWebSecurity引入了WebSecurityConfiguration、HttpSecurityConfiguration、AuthenticationConfiguration的bean对象和SpringWebMvcImportSelector、OAuth2ImportSelector选择引入的bean对象。
1
2
3
@Import({ WebSecurityConfiguration.class, SpringWebMvcImportSelector.class, OAuth2ImportSelector.class, HttpSecurityConfiguration.class }) @EnableGlobalAuthentication
其中 HttpSecurityConfiguration 的装配最重要,它帮我们装配了一个默认的 HttpSecurity 组件,这是配置Spring Security的关键组件。其中对 HttpSecurity 组件进行了默认的配置,配置开启了许多的过滤器组件 ,这些过滤器在 HttpSecurity .build() 时创建 。
springboot应用无需使用这个注解。它帮我们准备好了许多默认的过滤器组件,我们只需要httpSecurity.build()就可以使Http安全相关过滤器 注入生效。它还帮我们调用了webSecurity.build()装配好了web安全相关的过滤器 。
注意:先执行httpSecurity.build()再执行webSecurity.build()。webSecurity层次更高。
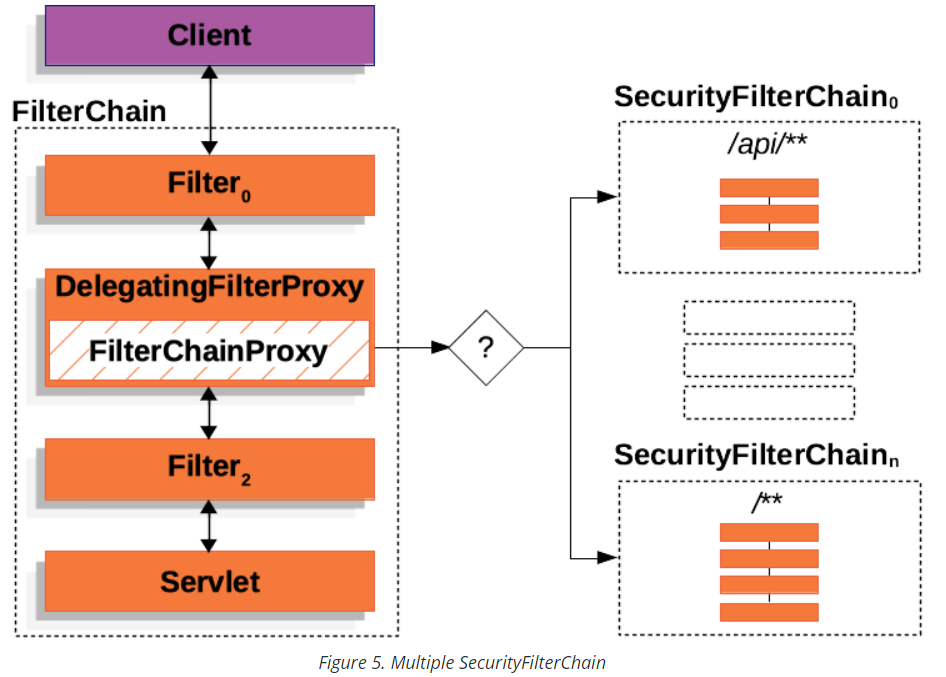
三、组件解析 1.DelegatingFilterProxy 用于给Servlet Filter做代理 (代理方),代理到 spring bean(被代理方),这样可以将spring bean中的过滤器通过 DelegatingFilterProxy 来注册到servlet容器的过滤器中。
DelegatingFilterProxy 是由 DelegatingFilterProxyRegistrationBean 来创建的,并将其注册到 Servlet 容器中。而这个注册bean是由 SecurityFilterAutoConfiguration 自动配置类装配的。
所以依赖关系如下:DelegatingFilterProxy –> DelegatingFilterProxyRegistrationBean –> SecurityFilterAutoConfiguration
DelegatingFilterProxy :用于给Servlet Filter做代理。代理的 targetBeanName 名字为 “springSecurityFilterChain”。
DelegatingFilterProxyRegistrationBean :用于注册 Servlet filter。
SecurityFilterAutoConfiguration :用于装配 DelegatingFilterProxyRegistrationBean 到 IOC容器。
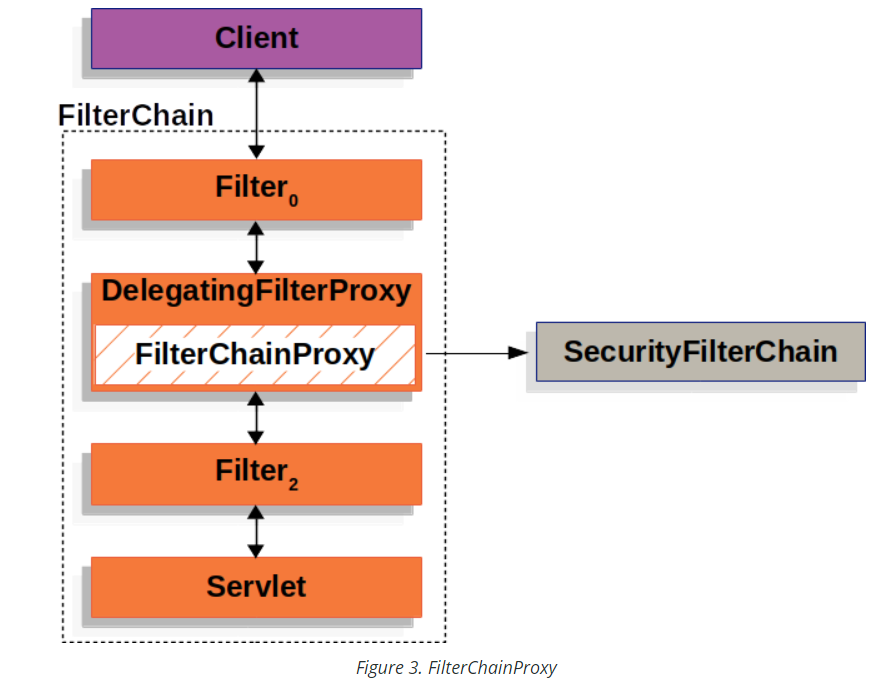
2. FilterChainProxy
是一个代理类,代理了 List<SecurityFilterChain> filterChains 多个 SecurityFilterChain 。同时这个对象被注入到DelegatingFilterProxy对象。
FilterChainProxy由 WebSecurity.buid() 创建出来 。并由 WebSecurityConfiguration 配置类来控制这个构建过程 。这个组件会将程序中所有由 httpSecurity.build() 构建的 SecurityFilterChain 全部重新整合构建为 FilterChainProxy。
The WebSecurity is created by WebSecurityConfiguration to create the FilterChainProxy known as the Spring Security Filter Chain (springSecurityFilterChain ). The springSecurityFilterChain is the Filter that the DelegatingFilterProxy delegates to.
所以 WebSecurityConfiguration 组件控制了 FilterChainProxy 的创建过程!
3.SecurityFilterChain 是一个过滤器链,其中又包含多个过滤器对象。并被 FilterChainProxy 所使用。
SecurityFilterChain由 http.build()创建出来 。当然 webSecurity在构建 FilterChainProxy 过程中也会创建SecurityFilterChain。但这里主要是指我们自定义的配置类控制 HttpSecurity 创建 SecurityFilterChain。
我们可以对 HttpSecurity 调用 requestMatcher() 方法控制此过滤链匹配的路径 ,但默认是匹配所有路径 。
HttpSecurityConfiguration创建了默认的 HttpSecurity 组件,但并没有通过HttpSecurity创建SecurityFilterChain。
所以我们自己配置的组件控制了 SecurityFilterChain 的创建过程。
4.WebSecurityConfiguration和WebSecurity WebSecurityConfiguration 是 Spring Security的配置类。
注入了 容器中所有的 SecurityFilterChain 组件 使用ObjectPostProcessor组件创建了 webSecurity 组件
使用 webSecurity组件和所有的 SecurityFilterChain 组件 创建了 FilterChainProxy 。
WebSecurity组件实现了具体构建 FilterChainProxy的逻辑。
核心代码:
1
2
3
4
5
6
7
8
9
10
11
12
13
14
15
16
17
18
19
20
21
22
23
24
25
26
27
28
29
@Bean(name = AbstractSecurityWebApplicationInitializer.DEFAULT_FILTER_NAME) public Filter springSecurityFilterChain () throws Exception { boolean hasConfigurers = this .webSecurityConfigurers != null && !this .webSecurityConfigurers.isEmpty(); boolean hasFilterChain = !this .securityFilterChains.isEmpty(); 。。。 if (!hasConfigurers && !hasFilterChain) { WebSecurityConfigurerAdapter adapter = this .objectObjectPostProcessor .postProcess(new WebSecurityConfigurerAdapter () { }); this .webSecurity.apply(adapter); } for (SecurityFilterChain securityFilterChain : this .securityFilterChains) { this .webSecurity.addSecurityFilterChainBuilder(() -> securityFilterChain); for (Filter filter : securityFilterChain.getFilters()) { if (filter instanceof FilterSecurityInterceptor) { this .webSecurity.securityInterceptor((FilterSecurityInterceptor) filter); break ; } } } for (WebSecurityCustomizer customizer : this .webSecurityCustomizers) { customizer.customize(this .webSecurity); } return this .webSecurity.build(); }
5.HttpSecurityConfiguration和HttpSecurity HttpSecurityConfiguration是 Spring Security的配置类。主要就创建了 HttpSecurity 组件 。内部对HttpSecurity进行了一些默认配置,配置了默认的过滤器链在构建时生效 。
HttpSecurity组件实现了具体构建 SecurityFilterChain/DefaultSecurityFilterChain 的逻辑。 还具有许多方法可以灵活的配置过滤器和权限规则。
核心代码:
1
2
3
4
5
6
7
8
9
10
11
12
13
14
15
16
17
18
19
20
21
22
@Bean(HTTPSECURITY_BEAN_NAME) @Scope("prototype") HttpSecurity httpSecurity () throws Exception { 。。。 HttpSecurity http = new HttpSecurity (this .objectPostProcessor, authenticationBuilder, createSharedObjects()); http .csrf(withDefaults()) .addFilter(new WebAsyncManagerIntegrationFilter ()) .exceptionHandling(withDefaults()) .headers(withDefaults()) .sessionManagement(withDefaults()) .securityContext(withDefaults()) .requestCache(withDefaults()) .anonymous(withDefaults()) .servletApi(withDefaults()) .apply(new DefaultLoginPageConfigurer <>()); http.logout(withDefaults()); applyDefaultConfigurers(http); return http; }
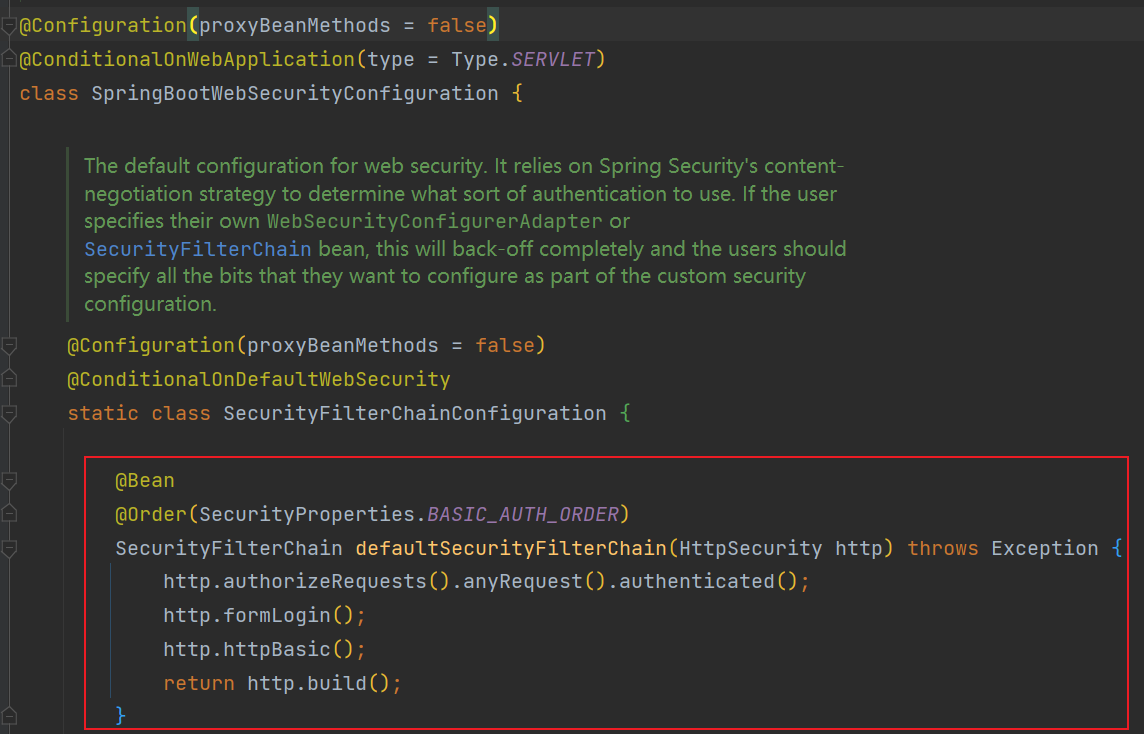
6.SecurityAutoConfiguration 是 Spring Boot 的自动配置类 。为我们引入了组件 SpringBootWebSecurityConfiguration 和 SecurityDataConfiguration ,还引入了 DefaultAuthenticationEventPublisher 认证事件发布组件。
核心代码:
1
2
3
4
5
6
7
8
9
10
11
12
13
@AutoConfiguration @ConditionalOnClass(DefaultAuthenticationEventPublisher.class) @EnableConfigurationProperties(SecurityProperties.class) @Import({ SpringBootWebSecurityConfiguration.class, SecurityDataConfiguration.class }) public class SecurityAutoConfiguration { @Bean @ConditionalOnMissingBean(AuthenticationEventPublisher.class) public DefaultAuthenticationEventPublisher authenticationEventPublisher (ApplicationEventPublisher publisher) { return new DefaultAuthenticationEventPublisher (publisher); } }
7.SpringBootWebSecurityConfiguration 是 Spring Boot 的自动配置类 。
如果我们没有配置 SecurityFilterChain 组件,会为我们默认配置一个 SecurityFilterChain 组件 ,否则就不配置。
配置一个 ErrorPageSecurityFilter 过滤器 到 servlet filter 中。使用注解 @EnableWebSecurity 。
核心代码:
1
2
3
4
5
6
7
8
9
10
11
12
13
14
@Configuration(proxyBeanMethods = false) @ConditionalOnDefaultWebSecurity static class SecurityFilterChainConfiguration { @Bean @Order(SecurityProperties.BASIC_AUTH_ORDER) SecurityFilterChain defaultSecurityFilterChain (HttpSecurity http) throws Exception { http.authorizeRequests().anyRequest().authenticated(); http.formLogin(); http.httpBasic(); return http.build(); } }
8.SecurityFilterAutoConfiguration 是 Spring Boot 的自动配置类 。用于注册过滤链集合到 servlet filter中。
实际上为我们装配了一个组件 DelegatingFilterProxyRegistrationBean 来用于注册过滤器。
核心代码:
1
2
3
4
5
6
7
8
9
10
@Bean @ConditionalOnBean(name = DEFAULT_FILTER_NAME) public DelegatingFilterProxyRegistrationBean securityFilterChainRegistration ( SecurityProperties securityProperties) { DelegatingFilterProxyRegistrationBean registration = new DelegatingFilterProxyRegistrationBean ( DEFAULT_FILTER_NAME); registration.setOrder(securityProperties.getFilter().getOrder()); registration.setDispatcherTypes(getDispatcherTypes(securityProperties)); return registration; }
四、无配置引入 代码实践
引入依赖,版本由spring boot版本管理。
1 2 3 4 <dependency > <groupId > org.springframework.boot</groupId > <artifactId > spring-boot-starter-security</artifactId > </dependency >
2.引入后就可以立即启动。
此时默认所有路径都需要认证,都会经过UsernamePasswordAuthenticationFilter过滤器,默认有登录页面。
源码解析 以上效果是Spring Boot自动装配 导致的,自动装配的配置类为org.springframework.boot.autoconfigure.security.servlet.SpringBootWebSecurityConfiguration。默认情况下它会创建一个SecurityFilterChain过滤链组件。组件SecurityFilterChain依赖于HttpSecurity组件。
源码分析如下:
代码 http.authorizeRequests().anyRequest().authenticated(); 配置了所有请求都需要认证 。
代码 http.formLogin(); 配置了将FormLoginConfigurer加入HttpSecurity,请求经过 UsernamePasswordAuthenticationFilter 过滤器来进行认证,同时由于未配置登录页路径会**使用默认登录页”/login”**。
代码 http.httpBasic(); 配置了将HttpBasicConfigurer加入HttpSecurity,请求经过 BasicAuthenticationFilter 过滤器来进行HTTP Basic认证 。
代码 http.build(); 根据以上代码来装配spring security的过滤链并返回SecurityFilterChain组件 。
默认情况下,Spring Boot UserDetailsServiceAutoConfiguration 自动化配置类,会创建一个内存级别 的 InMemoryUserDetailsManager Bean 对象,提供认证的用户信息。
以上我们分析了默认的SecurityFilterChain组件,这是Spring Boot默认为我们装配的。实际上我们需要自己配置一个SecurityFilterChain 组件或者 WebSecurityConfigurerAdapter 组件来覆盖此默认装配的组件。
五、配置引入 代码实践
引入依赖,版本由spring boot版本管理。
1 2 3 4 <dependency > <groupId > org.springframework.boot</groupId > <artifactId > spring-boot-starter-security</artifactId > </dependency >
2.配置组件。
配置Spring Security需要的组件
1
2
3
4
5
6
7
8
9
10
11
12
13
14
15
16
17
18
19
20
21
22
23
24
25
26
27
@Configuration public class SecurityComponentConfig { @Bean public AuthenticationEntryPoint authenticationEntryPoint () { return new AuthenticationEntryPointImpl (); } @Bean public AccessDeniedHandler accessDeniedHandler () { return new AccessDeniedHandlerImpl (); } @Bean public TokenAuthenticationFilter tokenAuthenticationFilter () { return new TokenAuthenticationFilter (); } }
注意在自定我们自己的Spring Security过滤器时,最好不要将过滤器注入IOC容器中 ,如果注入后spring boot会再次将此过滤器注册到servelet容器中,导致过滤器执行两次,如果我们一定要注入到IOC容器中我们可以控制spring boot不要注册此过滤器到servlet容器,代码示例如下:
1
2
3
4
5
6
7
@Bean public FilterRegistrationBean<TenantFilter> tenantFilterRegistration (TenantFilter filter) { FilterRegistrationBean<TenantFilter> registration = new FilterRegistrationBean <>(filter); registration.setEnabled(false ); return registration; }
配置Spring Security自身过滤器组件、添加过滤器组件、自身url的访问控制 。
1
2
3
4
5
6
7
8
9
10
11
12
13
14
15
16
17
18
19
20
21
22
23
24
25
26
27
28
29
30
31
32
33
34
35
36
37
38
39
40
41
42
43
44
45
46
47
48
49
50
51
52
53
54
55
56
57
58
59
60
61
62
63
64
65
66
67
68
69
70
71
72
73
74
75
76
77
78
79
80
81
82
83
84
85
86
87
88
89
90
91
92
93
94
95
96
97
98
99
100
101
102
103
104
105
106
107
108
109
110
@Configuration @EnableWebSecurity @EnableGlobalMethodSecurity(prePostEnabled = true) public class SecurityConfig { @Resource private AccessDeniedHandler accessDeniedHandler; @Resource private AuthenticationEntryPoint authenticationEntryPoint; @Resource private TokenAuthenticationFilter tokenAuthenticationFilter; @Resource private ApplicationContext applicationContext; @Bean public SecurityFilterChain securityFilterChain (HttpSecurity httpSecurity) throws Exception { httpSecurity .cors().and() .csrf().disable() .sessionManagement().maximumSessions(1 ).expiredUrl("/auth/logion" ).and() .sessionCreationPolicy(SessionCreationPolicy.STATELESS).and() .headers().frameOptions().disable().and() .exceptionHandling().authenticationEntryPoint(authenticationEntryPoint) .accessDeniedHandler(accessDeniedHandler); httpSecurity.addFilterBefore(tokenAuthenticationFilter, UsernamePasswordAuthenticationFilter.class); Multimap<HttpMethod, String> permitAllUrls = getPermitAllUrlsFromAnnotations(); httpSecurity .authorizeRequests() .antMatchers(HttpMethod.GET, "/*.html" , "/**/*.html" , "/**/*.css" , "/**/*.js" ).permitAll() .antMatchers(HttpMethod.GET, permitAllUrls.get(HttpMethod.GET).toArray(new String [0 ])).permitAll() .antMatchers(HttpMethod.POST, permitAllUrls.get(HttpMethod.POST).toArray(new String [0 ])).permitAll() .antMatchers(HttpMethod.PUT, permitAllUrls.get(HttpMethod.PUT).toArray(new String [0 ])).permitAll() .antMatchers(HttpMethod.DELETE, permitAllUrls.get(HttpMethod.DELETE).toArray(new String [0 ])).permitAll() .antMatchers("/captcha/get" , "/captcha/check" ).permitAll() .and().authorizeRequests() .anyRequest().authenticated(); return httpSecurity.build(); } private Multimap<HttpMethod, String> getPermitAllUrlsFromAnnotations () { Multimap<HttpMethod, String> result = HashMultimap.create(); RequestMappingHandlerMapping requestMappingHandlerMapping = (RequestMappingHandlerMapping) applicationContext.getBean("requestMappingHandlerMapping" ); Map<RequestMappingInfo, HandlerMethod> handlerMethodMap = requestMappingHandlerMapping.getHandlerMethods(); for (Map.Entry<RequestMappingInfo, HandlerMethod> entry : handlerMethodMap.entrySet()) { HandlerMethod handlerMethod = entry.getValue(); if (!handlerMethod.hasMethodAnnotation(PermitAll.class)) { continue ; } if (entry.getKey().getPatternsCondition() == null ) { continue ; } Set<String> urls = entry.getKey().getPatternsCondition().getPatterns(); Set<RequestMethod> methods = entry.getKey().getMethodsCondition().getMethods(); if (CollUtil.isEmpty(methods)) { result.putAll(HttpMethod.GET, urls); result.putAll(HttpMethod.POST, urls); result.putAll(HttpMethod.PUT, urls); result.putAll(HttpMethod.DELETE, urls); continue ; } entry.getKey().getMethodsCondition().getMethods().forEach(requestMethod -> { switch (requestMethod) { case GET: result.putAll(HttpMethod.GET, urls); break ; case POST: result.putAll(HttpMethod.POST, urls); break ; case PUT: result.putAll(HttpMethod.PUT, urls); break ; case DELETE: result.putAll(HttpMethod.DELETE, urls); break ; default : break ; } }); } return result; } }
六、还未完成,持续更新 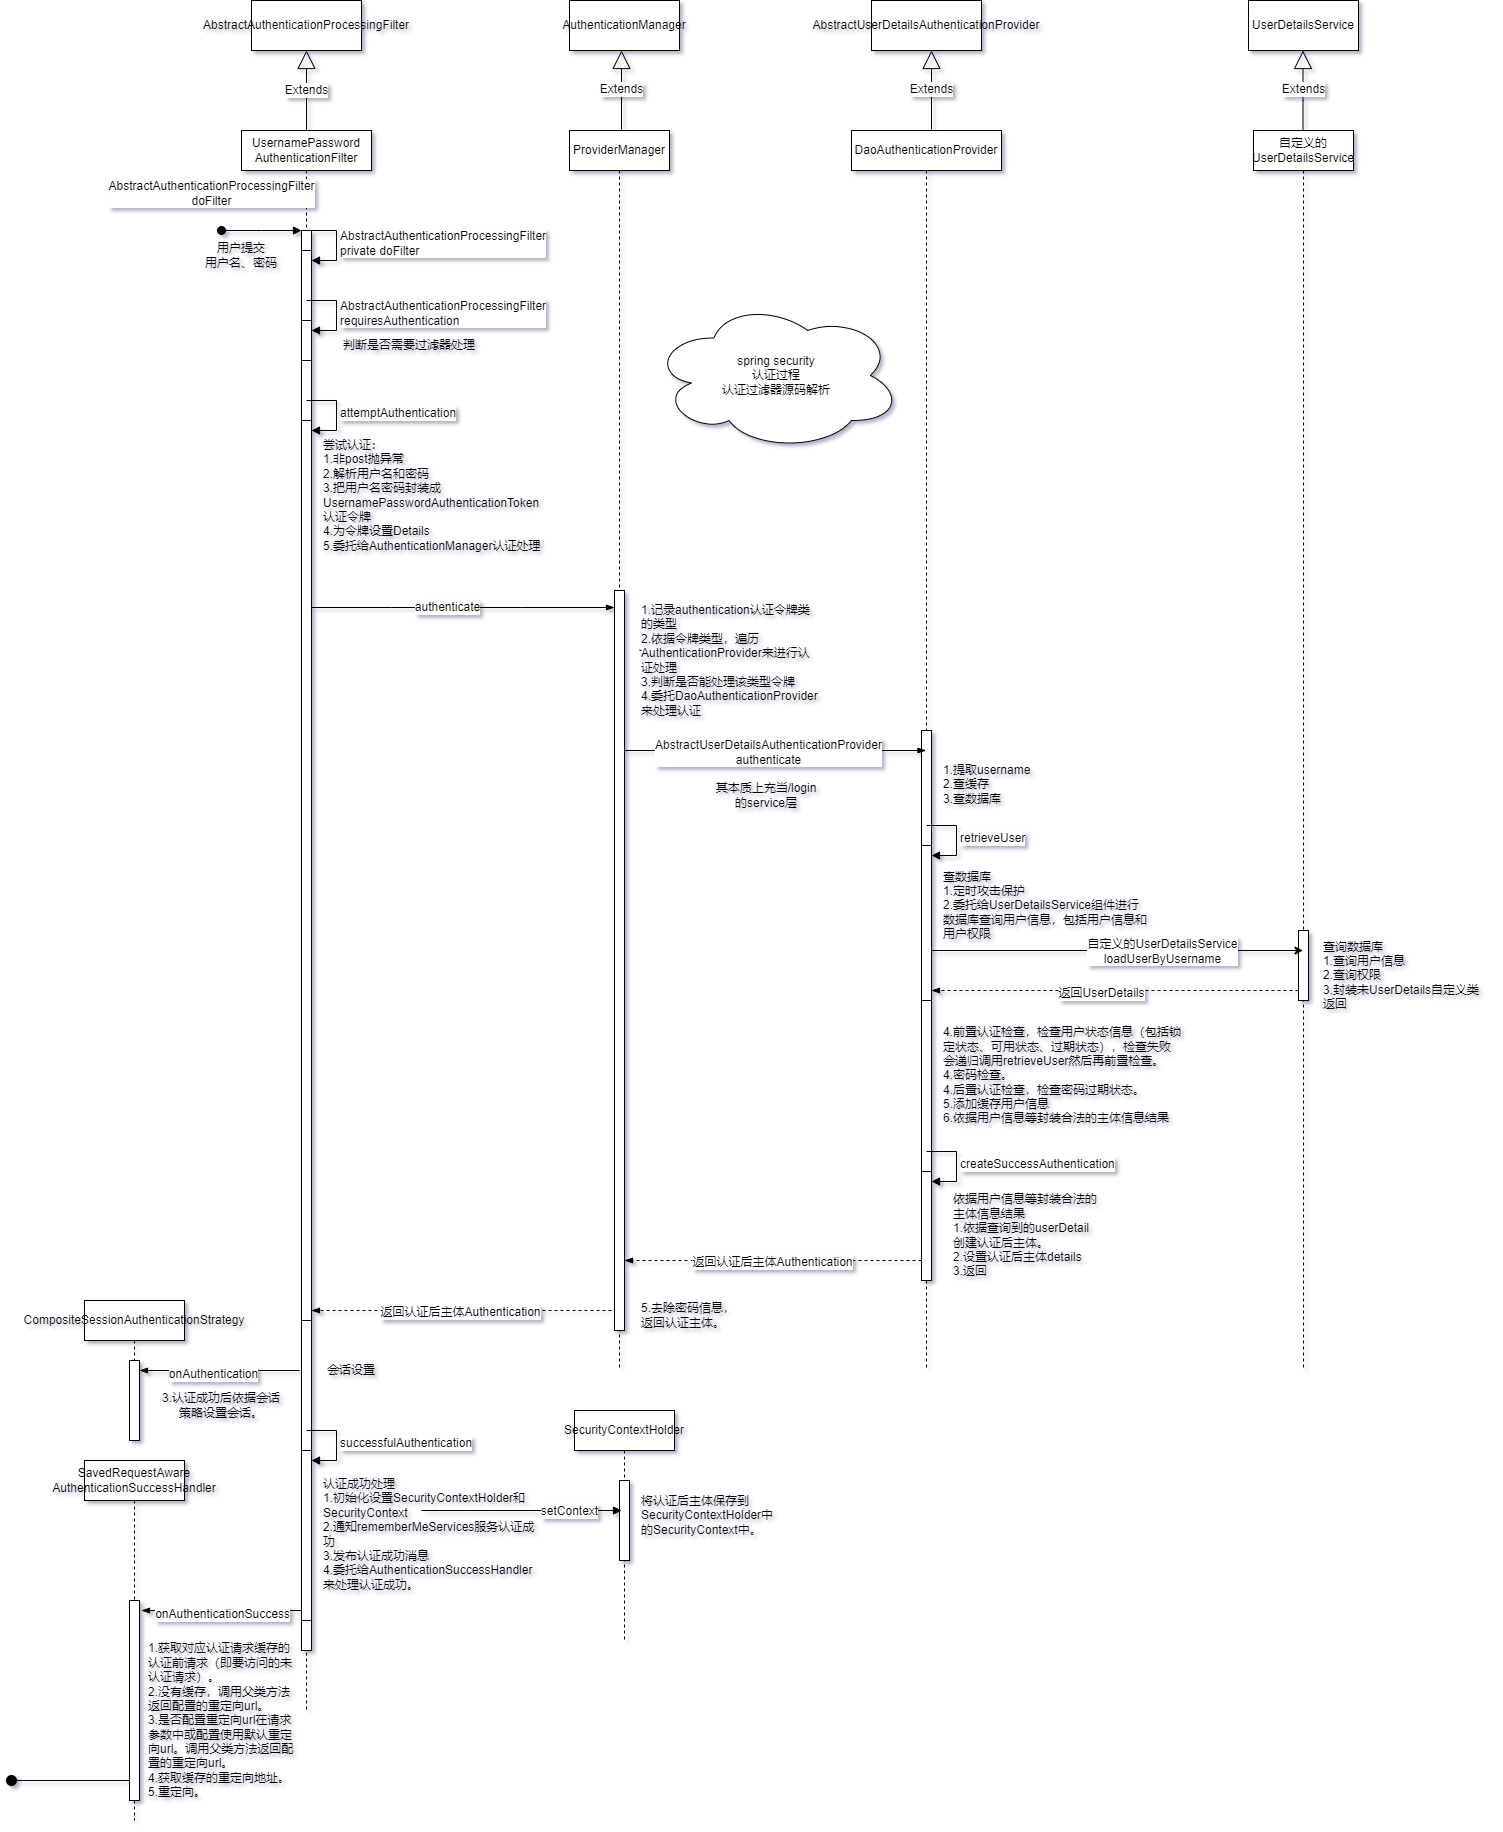
 wechat
 alipay